PULL UPS
Pull up progression
Overview: Pull ups work the muscles in your upper back (the latissimus dorsi, and the trapezius), in your shoulders (the anterior deltoids), and in your arms (the biceps and brachialis). The closer together the hands are placed, the more the emphasis is on the biceps. The further they are, the more emphasis on the lats. And of course, pull ups will also test your grip strength.
Form: Pull ups are normally performed with your hands facing away from you, while chin ups are done with your hands facing towards you (and chin ups also emphasize the biceps more). Of the two, chin ups are generally considered to be the slightly easier version.
About the progression: Transitions between the first few variations are tough in this progression. However, the horizontal pulls progression works similar muscles to pull ups, and it has a much gentler gradient. The two benefit from each other greatly.

1. Leg assisted pull ups
Place a chair under your pull up bar, and assist yourself with one leg as you pull your body up. The key here is that you control how much help you get from your assisting leg. Try to reduce this assistance over time. This can be done by placing just the tip of your toes on the chair under you.
Place a chair under your pull up bar, and assist yourself with one leg as you pull your body up. The key here is that you control how much help you get from your assisting leg. Try to reduce this assistance over time. This can be done by placing just the tip of your toes on the chair under you.
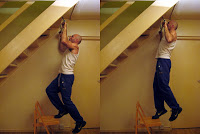
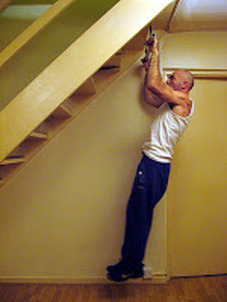
2. Jackknife pull ups.
Place a high object under and in front of your pull up bar (a sturdy chair or -even better- a table). Placement is key for jackknife pull ups to be effective: ideally, the table or chair should be high enough for your legs to rest on it at 90 degrees or less to your torso, with your waist bent. Push with your heels into the chair or table and straighten your waist whilst bringing your chin to the bar. Here's a video demonstration: jackknife pull ups.
Place a high object under and in front of your pull up bar (a sturdy chair or -even better- a table). Placement is key for jackknife pull ups to be effective: ideally, the table or chair should be high enough for your legs to rest on it at 90 degrees or less to your torso, with your waist bent. Push with your heels into the chair or table and straighten your waist whilst bringing your chin to the bar. Here's a video demonstration: jackknife pull ups.
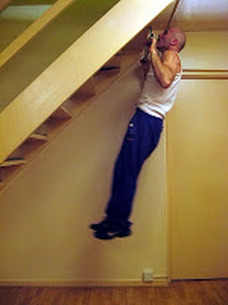
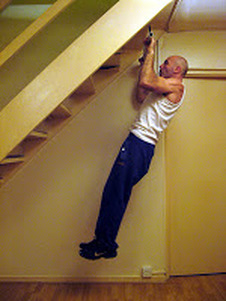
3. Eccentric pull ups.
Jump up in the pull up position with your chin above the bar, then slowly lower yourself down to the count of 5 seconds.
Jump up in the pull up position with your chin above the bar, then slowly lower yourself down to the count of 5 seconds.
4. Half pull ups (top half).
Start in mid range, and pull yourself up through half the range of motion, until your chin clears the bar. Then lower yourself back to mid range (elbows bent at 90 degrees).
Start in mid range, and pull yourself up through half the range of motion, until your chin clears the bar. Then lower yourself back to mid range (elbows bent at 90 degrees).
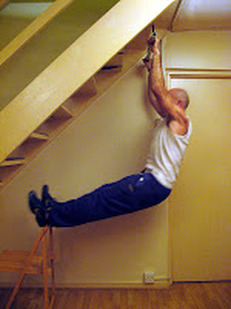
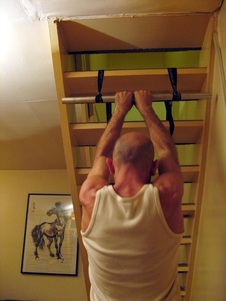
5. Half pull ups (bottom half)
Start from a dead hang, and pull yourself up through half the range of motion, until your arms form a 90 degree angle (mid range). Then lower yourself back to a dead hang.
Start from a dead hang, and pull yourself up through half the range of motion, until your arms form a 90 degree angle (mid range). Then lower yourself back to a dead hang.
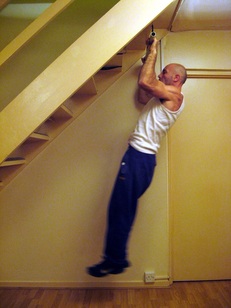
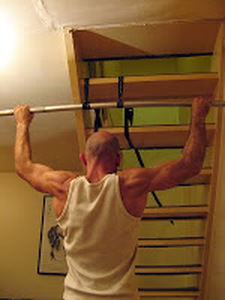
6. Pull ups.
From a dead hang, pull yourself up till your chin clears the bar.
From a dead hang, pull yourself up till your chin clears the bar.
7. Close grip pull ups.
Same as a pull up, but with your hands close together. This variation places added emphasis on your biceps.
Same as a pull up, but with your hands close together. This variation places added emphasis on your biceps.
8. Wide grip pull ups.
Same as a pull up, but with your hands further than shoulder width apart. This variation places added emphasis on your latissimus dorsi.
Same as a pull up, but with your hands further than shoulder width apart. This variation places added emphasis on your latissimus dorsi.
9. Archer pull ups.
Focus on pulling with one arm, with minimal assistance from the other. The other arm should gradually straighten over the bar during the pulling motion. Only go up to 6 on each arm, alternating each arm, rather than the 8 reps the basic routine calls for. This variation of pull ups is key to working your way to a muscle up. If 4 archer pull ups are too much to begin with, start with 3 on each arm.
Here's a quick video demonstration of archer pull ups.
10. Sternum pull ups.
This move shifts the emphasis away from the latissimus dorsi, but it is another key step in the progression towards a muscle up. Perform a pull up until the bar is at chest level. Make sure your elbows remain close to your body throughout the later part of the move, and that they drive back past your shoulders. This move is not to be confused with the 'gironda sternum pull up', through which your back is arched.
This move shifts the emphasis away from the latissimus dorsi, but it is another key step in the progression towards a muscle up. Perform a pull up until the bar is at chest level. Make sure your elbows remain close to your body throughout the later part of the move, and that they drive back past your shoulders. This move is not to be confused with the 'gironda sternum pull up', through which your back is arched.
11. Belly button pull ups.
Same as above, but pull more explosively until your belly button is level with the bar. Again, your elbows should brush past your sides, and drive back past your shoulders.
Same as above, but pull more explosively until your belly button is level with the bar. Again, your elbows should brush past your sides, and drive back past your shoulders.
Pull up bar for home
- Ideal for pull-ups, push-ups, chin-ups, dips, crunches, and more
- Three grip positions, narrow, wide, and neutral
- Uses leverage to hold against the doorway so there are no screws and no damage to door. Installs in seconds.
